클레오카지노 는 국내 몇 안되는 안전한 카지노로 손 꼽힙니다. 안전과 보안보다는 중요한 게 없다는 철칙이 있습니다. 언제든지 오셔서 게임을 즐기세요. 지금부터 왜 안전 한지에 대해 모든 것을 알려드립니다. 플레이어의 안전을 보장하기 위해 많은 단계를 거칩니다. 안전한 온라인 카지노를 찾으신다면 바로 여기 CleoCasino에서 플레이 해보세요.
최신 라이센스
안전한 온라인 카지노의 대표적인 요소로는 라이센스의 취득입니다. 합법적인 카지노의 대표 주자인 클레오 역시 라이센스를 취득하여 안전하게 운영중입니다.
입출금 방식
유저의 돈을 안전하게 충/환전을 신속하게 처리하는 사이트입니다. 최근에는 암호 화폐 역시 사용 가능해지며 많은 사람들의 관심을 받고 있습니다.
플레이 리뷰
리뷰는 온라인 카지노 사이트를 알아보는 사람에게 많은 정보를 줍니다. 클레오는 실제 사용자의 리뷰가 가장 많은 사이트 중 하나로 진정성 있는 리뷰들을 많이 볼 수 있습니다.
안전하게 플레이하는 팁
고객 서비스 확인
안전한 카지노의 표시입니다. 궁금한 부분은 전부 라이브 채팅을 통해 물어보시면 24시간 상주하고 있는 직원이 친절하고 신속하게 대응합니다.
자금 관리 연습
안전한 카지노에서 플레이 하실 수 있지만 자금 관리를 하지 않는다면 소용이 없습니다. 게임 시작 전, 얼마나 돈을 사용할지 결정을 한 뒤 자금을 관리해야합니다.
자신의 본능을 믿기
카지노 사용 중 무언가가 불안하거나 불만이 있다면 가볍게 넘기지 마시고 사용하지 마세요. 100% 안전하다고 하지만 본능에 따라 움직이세요.
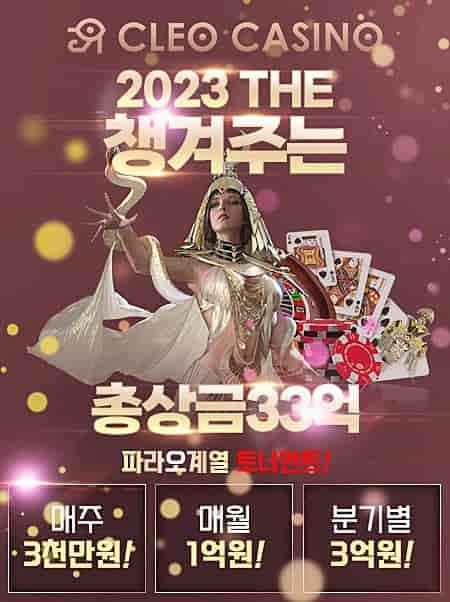
클레오카지노 이벤트
보너스 및 이벤트 1위 온라인 카지노 사이트로, 서둘러 가입해서 혜택을 받아보세요. 클레오 전체 회원 등급은 베팅 제한 금액이 없습니다. 그만큼 자본에 자신 있다는 뜻이며, 다 퍼주는 이벤트 및 쿠폰을 잘 활용하셔서 좀 더 효과적인 플레이를 즐겨보세요.
2023 THE 챙겨주는 총 상금 33억 파라오 계열 토너먼트
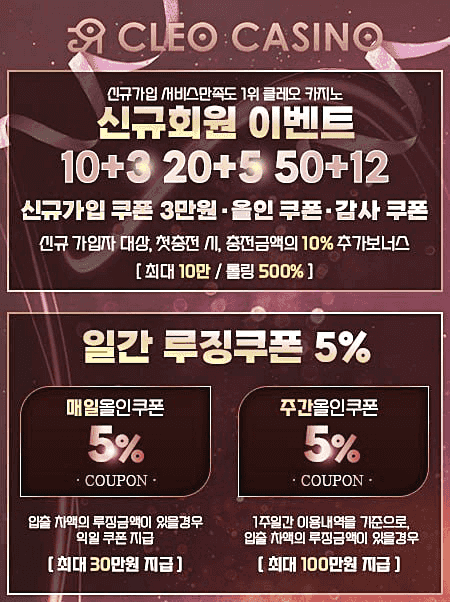
신규회원 이벤트 10+3, 20+5, 50+12
매일/주간 루징 쿠폰 5%
1,2,3 출석 이벤트
지인, 추천인 이벤트
텔레그램 채널 가입 이벤트
후기 작성 이벤트
클레오 카지노 제공 게임
라이브 카지노, 슬롯 게임, 스포츠 배팅, 파워볼, IDN 포커의 게임 종류를 제공하고, 세계적인 온라인 카지노 게임 소프트웨어 플랫폼과 함께합니다. 정식 라이센스를 보유하고 각 게임들은 고품질로 유저들의 화면 속에 나타납니다. 최고의 라이브를 위해 영상 송출에 최선을 다하고 있으며, 난수 생성기 (RNG)를 도입해 조작 없는 게임으로 유저가 마음 놓고 안전하게 게임을 즐길 수 있게 합니다.
라이브 카지노
11개의 플랫폼을 제공함 실시간 딜러와의 승부를 통해 흥미진진한 게임을 즐겨보세요.
슬롯 게임
15개의 플랫폼에서 3000개 이상의 슬롯 게임을 제공합니다. 다양한 테마에서 즐길 수 있는 모든 것을 플레이 해보세요.
스포츠 배팅
5개의 플랫폼에서 모든 스포츠 경기를 경험하세요. 각각 배당이 다를 테니 룰을 꼭 숙지 하고 플레이하세요.
파워볼
동행 복권을 기본으로 엔트리 파워볼을 이용하여 쉽게 접근할 수 있도록 서비스를 제공합니다. 언제 어디서나 편하게 즐겨보세요.
IDN 포커
IDNPLAY에서 제작된 온라인 카드 게임으로 독특한 방식으로 게임이 진행되는 것이 특징입니다. 모바일에 특화된 게임입니다.
IDN 포커 플레이 영상
클레오카지노 공식 도메인
클레오카지노 안전한 사이트로 입장을 하시기 위해서는 해당 페이지의 배너 혹은 바로가기 버튼을 통해 접속하세요. 그래야 자금에 대한 안전과 클레오의 보안을 2중으로 받으며 게임을 플레이 하실 수 있습니다. 안전 배너를 통하지 않으시고 가입하신다면 저희가 책임을 물어드릴 수가 없습니다. 검증 된 공식 도메인으로 편안하게 게임을 이용 해보세요.
많은 온라인 카지노 사이트를 이용해왔지만 클레오카지노는 안전 하나 만큼은 확실한 것 같습니다. 무언가 불안정한 홈페이지라면 이렇게 할 수 없습니다. 물론 선택은 본인 몫입니다. 어느 사이트를 가시든 안전한 카지노에서 자기만의 플레이를 하시길 바라겠습니다. GOOD LUCK!
